Create GIFs from Video Clips with FFmpeg: Ultimate Guide

Creating animated GIFs from video clips is a popular way to share memorable moments, tutorials, or engaging content. With FFmpeg, a powerful open-source multimedia framework, you can easily create GIFs from video clips while maintaining control over quality and customization. This guide will walk you through the process step-by-step, ensuring even beginners can master this skill.

Why Use FFmpeg for GIF Creation?

FFmpeg offers unparalleled flexibility for converting video clips into GIFs. Unlike online tools, it allows precise adjustments to frame rates, resolutions, and color palettes. Whether you’re extracting a reaction clip from a movie or turning a gameplay highlight into a shareable animation, FFmpeg provides command-line precision for optimal results.

Step 1: Install FFmpeg

First, download and install FFmpeg for your operating system:
Windows: Use the official builds or package managers like Chocolatey.
macOS: Install via Homebrew (brew install ffmpeg).
Linux: Use sudo apt-get install ffmpeg (Debian-based) or equivalent commands.

Step 2: Basic GIF Conversion Command

To generate a GIF from a video clip, use this basic syntax:
ffmpeg -i input.mp4 -ss 00:00:10 -t 3 output.gif
-ss 00:00:10: Start at 10 seconds
-t 3: Capture 3 seconds of footage

Step 3: Optimize Quality and File Size

Adjust parameters for better results:
1. Resize the GIF:
ffmpeg -i input.mp4 -vf scale=320:-1 output.gif
2. Control Frame Rate:
ffmpeg -i input.mp4 -r 15 output.gif
3. Improve Color Palette:
ffmpeg -i input.mp4 -vf 'fps=10,scale=600:-1:flags=lanczos,palettegen' palette.png
ffmpeg -i input.mp4 -i palette.png -lavfi 'fps=10,scale=600:-1:flags=lanczos [x]; [x][1:v] paletteuse' output.gif

Advanced Techniques

  • Trim Specific Sections: Combine -ss and -to flags for exact timing
  • Add Text Overlays: Use drawtext filter for captions
  • Reverse GIFs: Insert the reverse filter before output

Troubleshooting Common Issues

  • Large File Sizes: Reduce resolution, frame rate, or color count
  • Blurry Output: Use the lanczos scaling algorithm
  • Sync Errors: Match the input video’s native frame rate

Streamline Your Workflow

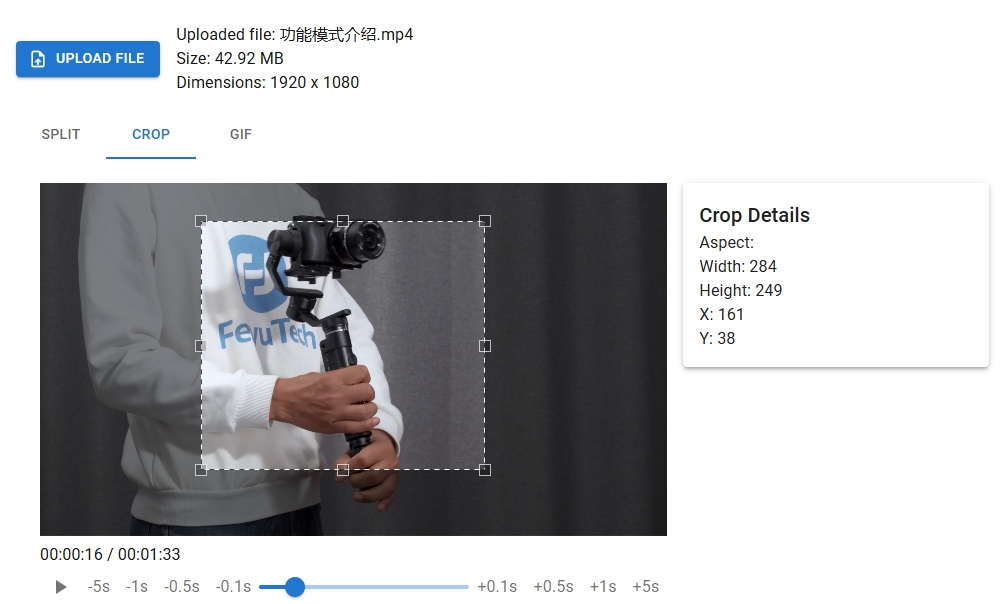
For users who prefer a graphical interface, FFmpeg.DVE2.com offers an online tool to generate FFmpeg scripts for creating GIFs from video clips. This platform automatically builds optimized commands based on your requirements, eliminating manual coding errors.

Whether you’re a content creator or developer, mastering FFmpeg for GIF creation unlocks new possibilities for visual storytelling. Start experimenting with these commands today, and for quick solutions, visit https://ffmpeg.dve2.com to generate custom FFmpeg scripts instantly.

Create GIFs from Video Clips with FFmpeg: Ultimate Conversion Guide

FFmpeg is a powerful command-line tool for video processing, and one of its most practical applications is to create GIFs from video clips. Whether you want to generate animated snippets for social media, tutorials, or memes, learning how to make GIFs with FFmpeg provides precise control over quality and timing. In this guide, you’ll discover step-by-step methods to convert video segments into optimized GIF files while exploring essential parameters like frame rate, resolution, and color palette adjustments.

Installing FFmpeg

First, ensure FFmpeg is installed on your system. For Ubuntu/Debian:

sudo apt update && sudo apt install ffmpeg

On macOS (using Homebrew):

brew install ffmpeg

Basic GIF Conversion

To extract a 5-second GIF starting at 00:01:20 from a video:

ffmpeg -ss 00:01:20 -t 5 -i input.mp4 output.gif

This command uses -ss to set the start time and -t to specify the duration.

Adjusting Frame Rate and Size

Reduce file size by limiting the frame rate and scaling:

ffmpeg -i input.mp4 -vf \
"fps=10,scale=320:-1:flags=lanczos" \
output.gif

Here, fps=10 sets 10 frames per second, and scale=320:-1 resizes the width to 320px while maintaining aspect ratio.

Optimizing Color Quality

GIFs often suffer from color banding. Generate an optimized palette first:

ffmpeg -i input.mp4 -vf \
"fps=15,scale=640:-1:flags=lanczos,palettegen" \
palette.png

Then create the GIF using the palette:

ffmpeg -i input.mp4 -i palette.png -filter_complex \
"[0:v]fps=15,scale=640:-1:flags=lanczos[v];[v][1:v]paletteuse" \
output.gif

This two-step process significantly improves color accuracy.

Advanced Customization

Add text overlay or trim precisely:

ffmpeg -ss 00:00:05 -t 3 -i input.mp4 \
-vf "drawtext=text='FFmpeg GIF':x=10:y=10:fontsize=24:fontcolor=white" \
output.gif

Common Issues & Solutions

  1. Large File Size: Reduce resolution, frame rate, or use dithering.
  2. Poor Quality: Use palette optimization and Lanczos scaling.
  3. Sync Errors: Ensure input formats are properly specified.

For those who prefer a streamlined solution, visit FFmpeg.DVE2.com to generate custom FFmpeg scripts for GIF creation instantly. Our online tool automates complex parameters, making video-to-GIF conversion effortless!

Convert Video to GIF Using FFmpeg: Complete Command-Line Guide

How to Convert Video to GIF Using FFmpeg: A Step-by-Step Guide

Introduction

Converting video clips to GIFs is a popular way to share moments on social media, documentation, or websites. FFmpeg, the powerful command-line tool, makes this process efficient and customizable. In this guide, you’ll learn how to convert videos to high-quality GIFs using FFmpeg commands.

Installing FFmpeg

Before starting, ensure FFmpeg is installed on your system:

Windows

  1. Download the latest build from FFmpeg’s official site.
  2. Add FFmpeg to your system’s PATH variables.

macOS

brew install ffmpeg

Linux

sudo apt-get install ffmpeg

Basic Video-to-GIF Conversion

Use this command to convert a video to a GIF:
ffmpeg -i input.mp4 output.gif

Adjusting Frame Rate and Size

To reduce file size and control quality:
ffmpeg -i input.mp4 -vf "fps=15,scale=640:-1" output.gif
fps=15 Sets frames per second.
scale=640:-1 Resizes width to 640px, maintaining aspect ratio.

Optimizing GIF Quality

Palette-Based Conversion

Generate a custom color palette for better quality:
ffmpeg -i input.mp4 -vf "fps=15,scale=640:-1:flags=lanczos,palettegen" palette.png

ffmpeg -i input.mp4 -i palette.png -filter_complex "fps=15,scale=640:-1:flags=lanczos[x];[x][1:v]paletteuse" output.gif

This reduces color banding and improves visual fidelity.

Advanced Tweaks

Trimming Video Clips

Extract a segment (e.g., 5 seconds starting at 00:00:10):ffmpeg -ss 00:00:10 -t 5 -i input.mp4 -vf "fps=15,scale=640:-1" clip.gif

Looping GIFs Infinitely

Add a loop flag:ffmpeg -i input.mp4 -loop 0 output.gif

Common Issues & Solutions

  • Large File Size? Reduce resolution, fps, or use dithering.
  • Poor Quality? Use the palette method above.
  • Partial Conversion? Check input file integrity.

Automate with FFmpeg Script Generators

Manually crafting FFmpeg commands can be time-consuming. For quick, error-free scripts, try ffmpeg.dve2.com. This online tool generates optimized FFmpeg commands for GIF conversion, resizing, trimming, and more—perfect for beginners and experts alike!

Conclusion

Mastering FFmpeg commands unlocks precise control over GIF creation. Whether for memes, tutorials, or UI animations, these techniques ensure high-quality results. For hassle-free script generation, visit ffmpeg.dve2.com today!

FFmpeg Tutorial for Beginners: How to Convert and Edit Videos with Ease

Getting Started with FFmpeg: A Beginner’s Guide

FFmpeg is a powerful open-source tool for handling multimedia files. Whether you want to convert video formats, extract audio, or stream content, FFmpeg has you covered. This guide will walk you through the basics of using FFmpeg, even if you’re a complete beginner.

What is FFmpeg?

FFmpeg is a command-line tool for processing audio, video, and other multimedia files. It supports a wide range of codecs and formats, making it a go-to solution for developers, content creators, and hobbyists.

Installing FFmpeg

  1. Windows: Download the latest build from FFmpeg’s official site and add it to your system’s PATH.
  2. macOS: Use Homebrew: brew install ffmpeg.
  3. Linux: Install via package manager (e.g., sudo apt install ffmpeg on Ubuntu).

Basic Commands

Here are some essential commands to get started:

1. Convert a Video Format

bash
ffmpeg -i input.mp4 output.avi

This converts input.mp4 to output.avi.

2. Extract Audio from a Video

bash
ffmpeg -i input.mp4 -vn -ab 128k output.mp3

The -vn flag disables video processing, extracting only audio.

3. Resize a Video

bash
ffmpeg -i input.mp4 -vf scale=640:480 output.mp4

Resizes the video to 640×480 pixels.

4. Trim a Video

bash
ffmpeg -i input.mp4 -ss 00:01:00 -to 00:02:30 -c copy output.mp4

Trims the video from the 1st minute to the 2nd minute and 30th second.

Advanced Use Cases

  • Merge Audio and Video:
    bash
    ffmpeg -i video.mp4 -i audio.wav -c:v copy -c:a aac output.mp4
  • Create a GIF from Video:
    bash
    ffmpeg -i input.mp4 -vf fps=10,scale=320:-1 output.gif

Common Flags Explained

  • -i: Specifies the input file.
  • -c:v and -c:a: Set video and audio codecs (e.g., libx264, aac).
  • -vf: Applies video filters (e.g., scaling, cropping).

Tips for Success

  1. Check File Formats: Use ffmpeg -formats to see supported formats.
  2. Use Presets: Speed up encoding with presets like -preset ultrafast.
  3. Read Documentation: FFmpeg’s official documentation is a goldmine.

Automate FFmpeg Commands with Ease

Writing FFmpeg commands manually can be time-consuming. For a hassle-free experience, try ffmpeg.dve2.com, an online tool that generates custom FFmpeg scripts based on your needs. Whether you’re converting files, adjusting quality, or adding filters, this platform simplifies the process with a user-friendly interface.


Start experimenting with FFmpeg today, and unlock endless possibilities for multimedia processing!

Efficiently Process Large Video Batches with FFmpeg

How to Quickly Process a Large Number of Videos Using FFmpeg

Introduction to FFmpeg

FFmpeg is a powerful, open-source software suite that can decode, encode, transcode, mux, demux, stream, filter, and play almost anything that humans and machines have created. It supports the most obscure ancient formats up to the cutting edge. No matter if they were designed by some standards committee, the community, or a corporation. It is also highly portable: FFmpeg compiles, runs, and passes our testing infrastructure FATE across Linux, Mac OS X, Microsoft Windows, the BSDs, Solaris, etc. under a wide variety of build environments, machine architectures, and configurations.

Why Use FFmpeg for Video Processing?

FFmpeg is incredibly efficient for processing large batches of videos. It can handle a wide range of video formats and codecs, making it a versatile tool for video editing, conversion, and compression. Its command-line interface allows for automation and scripting, which is perfect for processing a large number of files without manual intervention.

Getting Started with FFmpeg

To start using FFmpeg, you first need to install it on your system. Installation instructions vary depending on your operating system, but detailed guides can be found on the official FFmpeg website. Once installed, you can begin processing videos by using the command line.

Basic Commands

Here are some basic FFmpeg commands to get you started:

  • Convert a video file to another format: ffmpeg -i input.mp4 output.avi
  • Extract audio from a video: ffmpeg -i input.mp4 -q:a 0 -map a output.mp3
  • Resize a video: ffmpeg -i input.mp4 -vf scale=640:360 output.mp4

Advanced Video Processing

For more advanced video processing, FFmpeg offers a plethora of options. You can concatenate multiple videos, add watermarks, adjust video speed, and much more. The key to efficiently processing a large number of videos is to automate these tasks using scripts.

Batch Processing with Scripts

Creating a script to batch process videos can save you a tremendous amount of time. Here’s a simple example of a bash script that converts all .mp4 files in a directory to .avi format:

!/bin/bash

for file in *.mp4; do
ffmpeg -i "$file" "${file%.mp4}.avi"
done

This script loops through all .mp4 files in the current directory and converts them to .avi format using FFmpeg.

Automating FFmpeg Tasks

While writing scripts can be powerful, it can also be time-consuming and prone to errors, especially for complex tasks. This is where online tools like ffmpeg.dve2.com come in handy. This website allows you to generate FFmpeg scripts online, tailored to your specific needs, without having to write a single line of code.

Why Use ffmpeg.dve2.com?

  • Ease of Use: Simply input your requirements, and the website generates the FFmpeg command for you.
  • Time-Saving: No need to manually write and test scripts.
  • Accuracy: Reduces the risk of errors in your FFmpeg commands.

Conclusion

FFmpeg is an indispensable tool for anyone looking to process a large number of videos efficiently. Whether you’re converting formats, resizing videos, or adding watermarks, FFmpeg’s command-line interface offers the flexibility and power needed to automate these tasks. And for those looking to streamline their workflow even further, online tools like ffmpeg.dve2.com provide an easy way to generate FFmpeg scripts, making video processing faster and more accessible than ever.

Start optimizing your video processing workflow today with FFmpeg and take advantage of the convenience offered by ffmpeg.dve2.com.

Mastering Image Batch Processing with FFmpeg: A Guide for Computer Experts

How Computer Experts Batch Process Images Using FFmpeg

Introduction to FFmpeg

FFmpeg is a powerful, open-source software suite that can handle multimedia files and streams. It’s widely used for video and audio processing, but it’s also incredibly effective for batch processing images. This capability makes it a favorite tool among computer experts who need to manipulate large numbers of images efficiently.

Setting Up FFmpeg for Image Processing

Before diving into batch processing, you’ll need to have FFmpeg installed on your system. Installation instructions vary depending on your operating system, but FFmpeg provides comprehensive guides on their official website. Once installed, you can start using FFmpeg commands to process your images.

Basic Commands for Image Processing

FFmpeg offers a range of commands for image processing. Here are a few basic ones to get you started:
Converting Image Formats: Convert images from one format to another (e.g., PNG to JPG).
Resizing Images: Adjust the dimensions of images to fit specific requirements.
Applying Filters: Apply various filters to images, such as blurring, sharpening, or color adjustments.

Batch Processing Images with FFmpeg

Batch processing is where FFmpeg truly shines. By using simple scripts, you can automate the processing of hundreds or even thousands of images. Here’s a basic example of a batch processing script:

bash
for img in *.jpg; do
ffmpeg -i "$img" -vf scale=640:360 "resized_$img"
done

This script resizes all JPG images in the current directory to 640×360 pixels. You can modify the script to perform different actions, such as converting formats or applying filters.

Advanced Techniques

For more complex tasks, FFmpeg allows you to chain multiple commands together. This enables you to perform several operations in a single pass, significantly reducing processing time. Additionally, FFmpeg supports scripting in various programming languages, offering even more flexibility and power.

Conclusion

FFmpeg is an indispensable tool for computer experts who need to batch process images. Its versatility, combined with the ability to automate tasks through scripting, makes it a powerful ally in any image processing workflow.

Promote FFmpeg Script Generation Website

For those who prefer a more user-friendly approach to generating FFmpeg scripts, visit ffmpeg.dve2.com. This online tool simplifies the process, allowing you to create custom FFmpeg scripts without needing to write code manually. Whether you’re a seasoned expert or a beginner, ffmpeg.dve2.com can help streamline your image processing tasks.